Server racks have been the backbone of in-house IT setups for years now, and despite the rise in cloud computing, organizations in a range of sectors are still looking for physical equipment housing that delivers on precision, accessibility and operational efficiency. They’re suitable for both home use and large data centres – which makes them pretty versatile.
When selecting a server rack it’s really important to go with a company that has a bit of experience, can tailor solutions to your needs and offers reliable service to make sure your needs are being met. The good news is that good quality server racks offer excellent value at a competitive price point – making them accessible to businesses of all sizes.
This guide is designed to give decision-makers some practical advice on choosing the right server rack for their needs, and covers topics like rack selection, sizing, components and installation best practices for infrastructure investments through 2028.
A server rack is essentially a standardised metal framework designed to house and organise servers, networking kit and supporting equipment in a space-efficient way. The 19 inch rack standard is a widely used one, which means that most manufacturers equipment can fit on it regardless of where it came from.
When planning equipment installation it’s really important to take into account the space inside the rack to make sure everything fits and is accessible. Server racks can differ from simple shelving units because they have standardised mounting rails, can handle heavier loads and have integrated cable management – server cabinets on the other hand are typically fully enclosed units with doors and side panels.
Despite the trend towards cloud migration on-premises server racks remain a crucial part of an organisation’s IT infrastructure for three main reasons: edge computing needs localised processing where cloud latency is a major issue, data sovereignty regulations require on-premises data retention in certain industries, and hybrid architectures require physical foundations to support distributed workloads.
RackyRax 19” Server Cabinets offer premium features at a very affordable price..
Most 19 inch rack mountable equipment is designed to fit into the racking without any issues. By stacking devices vertically in a single rack you can significantly reduce the amount of physical space needed on the floor. And because racks are modular it makes it easy to just add more servers or components as and when you need them. Standard 42U racks can hold dozens of servers, which again reduces the amount of floor space you need – and because they’re scalable you can just bolt on extra servers as your needs grow.

Selecting the right form factor is the very first decision you’ll need to make when planning a rack installation – and this is a big one. It will inform all of the other decisions you make around cooling, security, accessibility and long-term scalability.
Open-frame racks offer great airflow and unrestricted access to equipment. Two-post relay racks are good for lightweight switches and routers, while four-post racks will take heavier servers that need slide-out rails. They’re budget-friendly options for network distribution frames, test labs and secure data hall rows where security is less of an issue due to access controls.
Enclosed server rack cabinet configurations have four vertical posts with removable side panels and lockable doors. A standard configuration in UK server rooms is a 42U 600mm x 1000mm standing cabinet. These server cabinets offer controlled airflow, physical security, reduced noise levels and dust protection – but they do come at a higher cost due to the steel and locking mechanisms.
Wall-mounted racks in the 6U to 18U range are useful for small networks where space is limited. Common sizes include 9U with 450mm depth for compact office networks. However, you need to assess the wall construction – a full 18U cabinet can weigh anything up to 250kg depending on the equipment.
Specialised colocation racks have multiple lockable compartments within a single cabinet, enabling different tenants to share infrastructure while maintaining security. Three and four compartment 47U cabinets are common in MSP environments.
Specialised rugged enclosures for extreme environments.
Industrial and Outdoor Deployments – The Case for IP-Rated Cabinets
Industrial & outdoor deployments require real protection for kit: IP54 to IP67 rated cabinets will shield your equipment from damage, keep vandals out and withstand the elements. This extra investment pays back in spades – more kit lifespan = less hassle and financial outlay in the long run.
The 19-inch rack standard lays down the law for internal width between mounting rails – making it possible for kit from all sorts of different manufacturers to fit in any compatible rack. This standardisation is a major coup for flexibility – no vendor lock-in here. Most 19 inch rack mountable kit is designed with this in mind and will fit directly into the racking – so long as you stick to standard width.
One rack unit is exactly 44.45mm (1.75 inches) in height. And kit is available in various heights – 1U, 2U, 3U or 4U. To calculate how much you’ll need: three 1U servers plus one 2U UPS will take up 5U in total.
Common Full-Height Cabinet Sizes (2020-2026)
Standard rack widths vary from 600mm to 800mm. Now, the width you go for will determine how much space you have for cables on the side. A 600mm width is very practical for UK buildings with standard doorways – you can just get the kit in there. An 800mm width gives a lot more cable tray capacity – but you will need to make sure you have access routes that are that wide.
Common depths are 600mm, 800mm, 900mm and 1000mm. Your rule of thumb here is to take the deepest piece of kit you have and add on a minimum of 130mm for cabling & airflow. Never forget to check the inside dimensions of the rack to ensure your kit and cable management will fit inside. And if you’re installing a storage array that needs 750mm inside depth, you’ll need to specify a minimum of 880mm cabinet depth.
Plan to have 20-30% extra headroom beyond your calculated ‘u’ heights for future expansion. For a 42U cabinet you should be aiming for about 30-35U of kit deployment. Leaving some space over will help with thermal performance – getting the air to circulate properly.
The rack is more than just a metal frame on your wall – it’s the cabinet accessories that really make it tick, when it comes to usability, cooling efficiency and safety. And these accessories will all add up to make your installation last
Shelves for non-rackmount kit. Use 450mm shelves for your 600mm cabinets and 600-700mm shelves for your 1000mm cabinets. Weight capacity usually runs from about 50kg to 150kg depending on the mounting configuration.
Cable trays, finger ducts, and cable rings to name a few – all designed to reduce maintenance time and prevent equipment faults from all the stress on the cables. Proper routing will also support all that airflow – and colour-coding standards will make life a lot easier for your team.
From basic BS1363 UK outlet strips to C13/C19 PDUs – plenty of options out there. Intelligent PDUs with remote monitoring have been getting a lot of attention since around 2020. They give you real-time power consumption measurement and outlet level control for remote reboots.
Blanking panels to fill unused positions – stopping that hot exhaust air from recirculating. Essential for hot-aisle/cold-aisle arrangements in 42U and 47U cabinets.
Mounting rails to keep your kit secure and hold its weight during maintenance. Cage nuts get rid of the need to reach behind kit to fasten nuts. Castors & levelling feet for moving & stability. And for security, you’ve got key-operated & biometric door locks. Plus environmental sensors (temperature, humidity, door-open) give you real-time alerts.
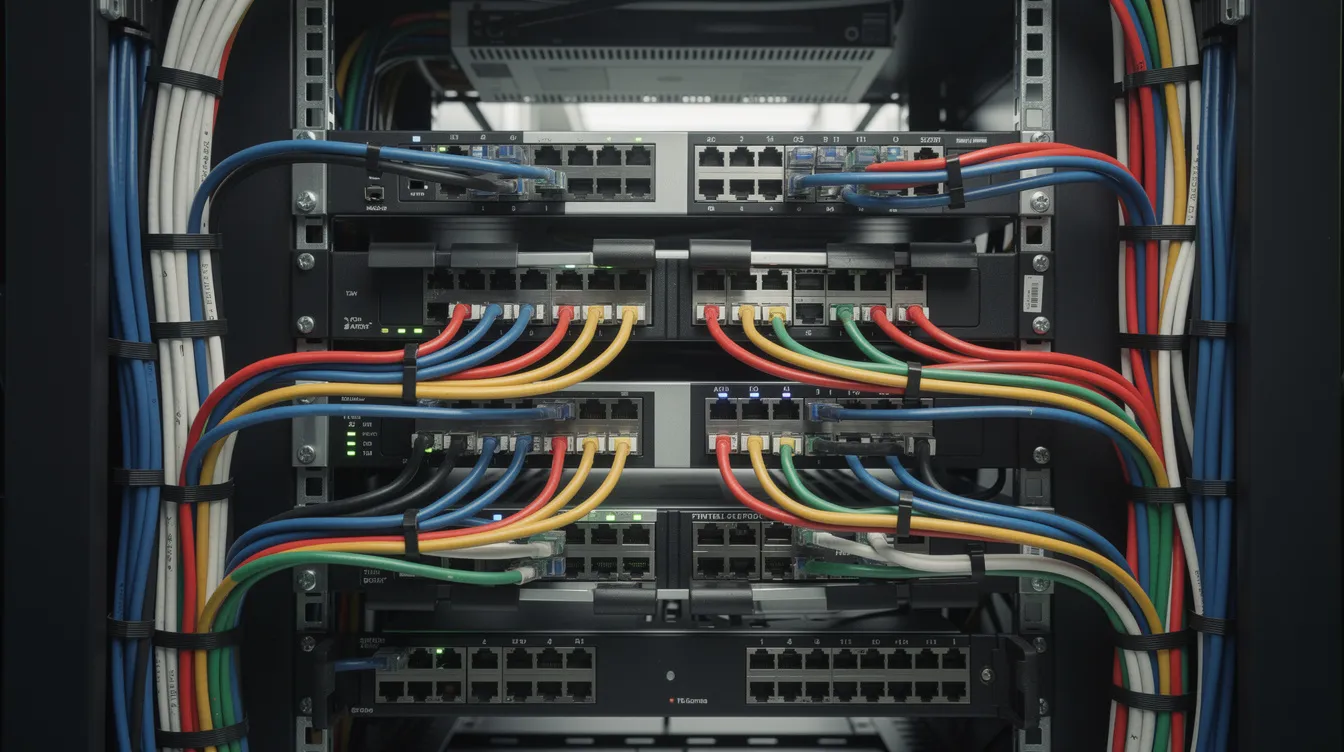
Keeping those cables in order is really, really important for maintaining an organised and efficient server rack cabinet. Properly managed cables not only keep the airflow & cooling going but also help you identify, access and service equipment when you need to. Using cable management accessories such as cable trays, cable ties, and cable management panels, will prevent damage to cables, reduce overheating and downtime caused by all those tangled and misplaced cables.
Installing server racks in the right way really makes a difference – especially when it comes to reliability, maintenance efficiency and the longevity of the rack over the 5-10+ years it will be in service.
Create some floor plans showing where the cabinets will go and how they will be orientated in relation to your hot & cold aisles. You should also be assessing your power circuits for redundant A/B feeds. And of course you need to plan your cable routes – through overhead trays, under-floor conduits or surface-mounted trunking, and consider any reusable server rack shipping cases for secure handling if racks will be transported between sites.
Level those cabinets to stop equipment stress. Anchor the racks where there’s a risk of accidental contact. And make sure that your cable entry points are lined up with any existing infrastructure to support same day commissioning wherever possible.
Sure, there are quite a few things you need to think about when it comes to power and redundancy. Balance PDU loads to keep them evenly split across the available circuits – it’s really important! Connect PDU-A and PDU-B to separate UPS feeds if you have them available. Make sure to label all the breakers, PDUs, and outlets with instructions on how the different circuit relationships work – it’s just good practice. Customers need to make sure they check on whether any exclusions still apply when it comes to getting warranty coverage if there is power-related damage.
To keep air flowing properly in and out of the equipment, make sure the gear is laid out so it’s working with front-to-back airflow. When you’re installing any blanking panels, put them in the unused spaces. Try to avoid running cables in front of perforated doors – it’s a real pain. You also need to keep a reasonable amount of space between the cabinet front and back.
To keep cables nice and tidy, implement a colour-code system – blue for data, yellow for management and red for out of band connections. Use the velcro ties rather than the regular zip ties, they are way easier to move around without damaging the cables. Label both ends of the cables, and make sure you’re using consistent naming conventions. See if you can find any adjustable options that will fit your set up. If you’ve got a lot going on, you might need to get some professional help to get it sorted.
Keep your rack elevation diagrams up to date, showing exactly where each piece of kit is and what it is (SKU details). Get some durable asset tags that tie in with your inventory system – it makes life a lot easier. Get some environmental monitoring going (door sensors and temperature alarms) it’s something lots of data centres started doing after 2020.
Have a review of the documentation at a regular date to make sure it’s all still accurate and add any new updates as the equipment changes. Just pop into your documentation system every now and again and make some updates.
Getting the right rack and installing it properly is the foundation of everything. Go through your current infrastructure against these standards, see what you can improve and make sure it’s meeting all your needs for the next 9 years or so.